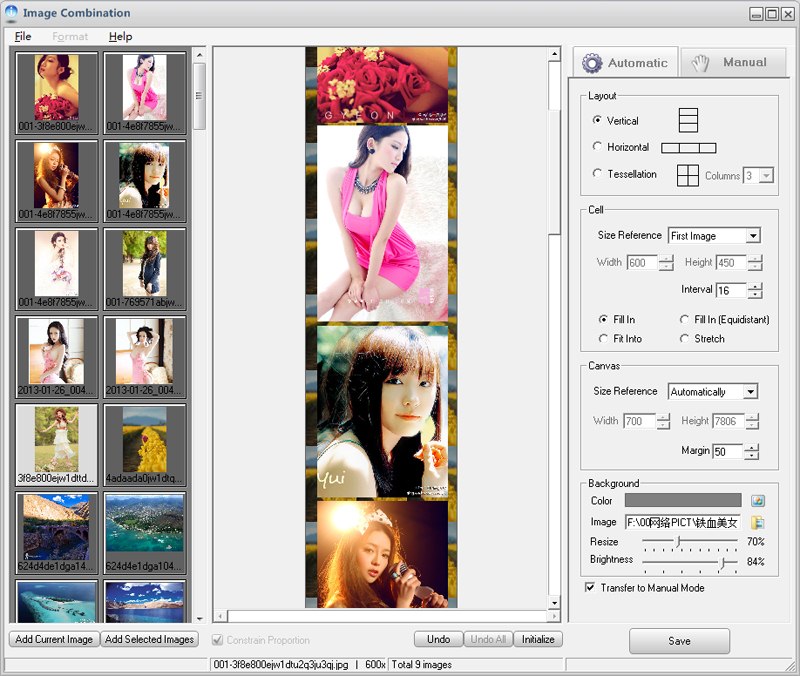
Automatic Mode: Graphics Converter Pro will automatically position, arrange and resize all the images.
Manual Mode: You can easily position, arrange and resize the images by the mouse.

Please follow the steps below:
1. Open Image Combination dialog: Choose menu item "Tools > Image Combination"
2. Add files to the thumb list: Just drag and drop your photos from Windows Explorer onto the list box.
3. Add image to the preview box
You have three methods:
Method 1: Double-click the image thumbs.
Method 2: Drag and drop your photos from Windows Explorer onto preview box.
Method 3: Click the "Add Current Image" or "Add Selected Images" button.
Tips: How to select images? Just hold Ctrl or Shift key, then click the thumb of the image you want to select.
4. Remove image from the preview box
Right-click the image, then choose "Remove Current Image" item from the function menu.
5. Position the images in the preview box
Automatic Mode: Right-click the image, then choose corresponding item from the function menu.
Manual Mode: Just drag and drop it(them).
6. Choose "Layout" option (Automatic Mode)
You can choose from three options: Vertical, Horizontal and Tessellation
7. Choose "Size Reference" of image cell (Automatic Mode)
You can choose a size reference from the drop-down list or customize the cell size.
8. Choose laying style for image cells (Automatic Mode)
You can choose from four options:
Fill in: The images will be laid with the same width in Vertical layout and same height in Horizontal layout, but it can not support Tessellation layout.
Fill in((Equidistant): The images will be laid with the same vertical spacing in Vertical layout and same horizontal spacing in Horizontal layout.
Fit Into: The images will be laid with the same style as "Fill in((Equidistant)" mode, but the image will not be enlarged.
Stretch: The images will be resized by the "Size Reference" option. Some images will be distorted if they don't have the same aspect ratio with the "Size Reference" image.
9. Choose Canvas size and Margin
We highly recommend that you choose the "Automatically" option in Automatic Mode.
10. Choose Background
You can choose to use background color or use an image as the background.
12. Click "Save" button to export the combined image to disk.
Other Options and Functions
1. Select images in preview box (Manual mode)
Just hold Ctrl or Shift key, then click the image you want to select.
After selecting images in preview box, the functions "Align", "Make Same Size", "Horizontal Spacing" and "Vertical Spacing" will be valid. You can position, arrange and resize the images by these functions.
2. "Constrain Proportion" Option (Manual mode)
It's a default option, this means that Graphics Converter Pro will automatically keep the aspect ratio after resizing the images.
3. "Transfer to Manual Mode" Option
It's a default option, this means that all the images and parameters will be automatically transferred to the Manual mode.