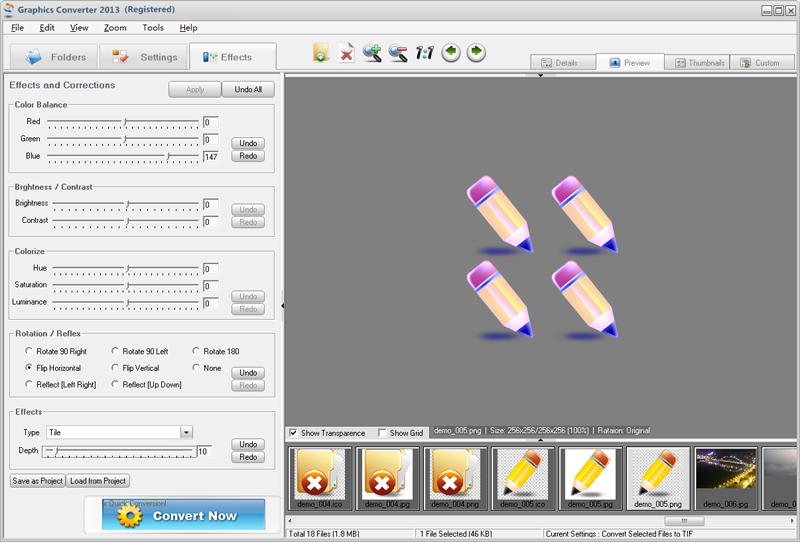
They are WYSIWYG functions.

To Apply Effects
1. First, choose the files you want to process and the output options. (See 2.2.2 Output Settings).
2. Click the Effects tab in the upper left corner to open the dialog box.
3. You can drag sliders or directly enter the value to set the 3 correction functions (like Color Balance).
4. You can click the radio buttons to choose the Rotation / Reflex options.
5. 40 effects are in the dropdown list, you can choose anyone of them, then drag the slider or directly enter value to set the option.
6. Click the Convert Now button to start the conversion.
Notes:
a). Graphics Converter Pro will switch to Preview mode while the above operation is going on.
b). The Preview box shows the processing results (WYSIWYG) while the above operation is going on.
c). If you choose more than one effect, Graphics Converter Pro will only apply the effects after you release the mouse to avoid causing your CPU block.
d). Before clicking the Convert Now button, the Preview box only shows the preview of the effects. Your original images do not change at all.
Other Functions:
1. Undo/Redo: Cancel/Repeat your last setting.
2. Apply: Apply current effect settings to the new image in Preview box.
3. Undo All: Cancel all effect settings, and restore the image in Preview box.
4. Clear All: Clear all effect settings (Set all values to zero)
5. Save as Project: Save all current effect settings to a project file (See 2.2 Settings).
6. Load from Project: Load effect settings from a saved project file (See 2.2 Settings).